The Stagflationary Tech Divergence: Why NQ is Decoupling from Reality
Executive summary
The global macro landscape on Wednesday, June 3, 2026, is defined by a violent, self-reinforcing bifurcation. We are witnessing a classic "stagflationary tech divergence." While geopolitical tensions in the Middle East have pushed WTI crude (CL=F) to $94.47—a 32.63% spike—and Fed officials signal a hawkish pivot to combat persistent inflation, the Nasdaq-100 (NQ=F) continues to decouple, posting massive gains driven by concentrated alpha in semiconductor and mega-cap tech.
This is not a healthy bull market; it is a liquidity trap. The "convexity-yield trap" is in full effect: mega-cap tech momentum is forcing passive index rebalancing that necessitates the liquidation of long-duration Treasuries (TLT), which in turn steepens the yield curve and crushes the Russell 2000 (RTY=F). We are currently operating in a regime where the equity market is cannibalizing its own liquidity to sustain the valuation of a shrinking basket of winners.
Layer 1: Direct Impacts (The Trigger)
The immediate market reaction is a tale of two asset classes: Energy/Commodities and High-Growth Tech.
Energy & Commodities: Stalled Mideast peace processes have injected a massive risk premium into crude oil. CL=F is trading at $94.47, up 32.63%. This is a direct tax on the global economy. Copper (HG=F) is also "on the run," driven by supply-demand tightness, providing a tailwind for industrial sectors (XLI) and copper miners (COPX).
Tech Momentum: Despite the macro headwinds, NQ=F is surging to 30,709 (+22.71%). This is driven by aggressive earnings beats in the semiconductor space (NVDA, MRVL). The market is treating these names as the only viable "inflation hedges" with pricing power, effectively creating a safe-haven status for high-growth tech.
Monetary Policy: Fed officials have signaled a hawkish shift, citing inflation risks. The market is aggressively repricing the terminal rate, pressuring the long end of the curve (TLT).
Layer 2: Secondary Effects (The Ripple)
The direct impacts are creating severe sector dispersion and margin compression.
The RTY=F Pincer: Small-cap firms (RTY=F) are caught in a "debt-energy" pincer. They lack the pricing power of the NQ giants. Rising energy costs (CL=F) are hitting their operating margins, while the hawkish Fed tilt increases their debt-servicing costs. This is not just a dip; it is a structural margin contraction.
Defensive Rotation: The equity risk premium for large-cap tech is compressing, forcing institutional capital out of defensive sectors (XLP, XLU) and into the tech momentum trade. This is reducing the overall market's defensive cushion.
Reflation Trade: The rally in copper (HG=F) and industrials (XLI) is signaling a reflationary environment. This forces a re-pricing of the long end of the yield curve, which paradoxically creates a headwind for the very tech stocks leading the market.
Layer 3: Macro Propagation (The Transmission)
These ripples are now fundamentally altering market mechanics.
The NQ/ES Decoupling: The concentration of alpha in mega-cap semis has created a "convexity trap" in NQ=F. The index is decoupling from the broader ES=F term structure. As the market prices in a higher terminal rate, the opportunity cost of holding low-beta yield increases, triggering further capital flight into momentum-heavy tech.
Margin Compression Contagion: RTY=F is experiencing a contagion of margin compression. Because small-cap firms cannot pass on energy costs to consumers, their earnings power is eroding, widening credit spreads (HYG) and increasing refinancing risks.
USD Strength: The UUP (USD) is acting as a drag on RTY=F export-oriented small caps, while providing a tailwind for domestic-focused tech margins. This is creating a rare regime where NQ=F and UUP rise in tandem, breaking the traditional inverse correlation between the USD and growth stocks.
Layer 4: Non-Obvious Connections (The Alpha)
This is where the structural risks reside.
The Passive Rebalancing Liquidity Vacuum: If the "growth-at-all-costs" shift continues, the concentration in NQ=F will become so extreme that ES=F liquidity will dry up. We are approaching a point where a sudden shock to tech earnings would trigger a forced liquidation of the entire index, as there is no depth in the rest of the ES=F components to absorb the selling.
The Copper-Tech Arbitrage: While L2 suggests tech and commodities are diverging, the high-end semiconductor manufacturing process is increasingly copper-intensive. A 'reflation' trade actually lowers the relative cost-of-capital for tech giants with massive cash piles (NVDA) compared to small-caps, making them the only 'safe' inflation hedge.
The Convexity-Yield Trap Feedback Loop: The L3 'convexity trap' forces passive rebalancing, which necessitates selling long-duration Treasuries (TLT) to fund tech-heavy index weightings. This selling steepens the yield curve, which L2 identified as a drag on tech valuations. It is a self-reinforcing loop that eventually breaks the tech rally.
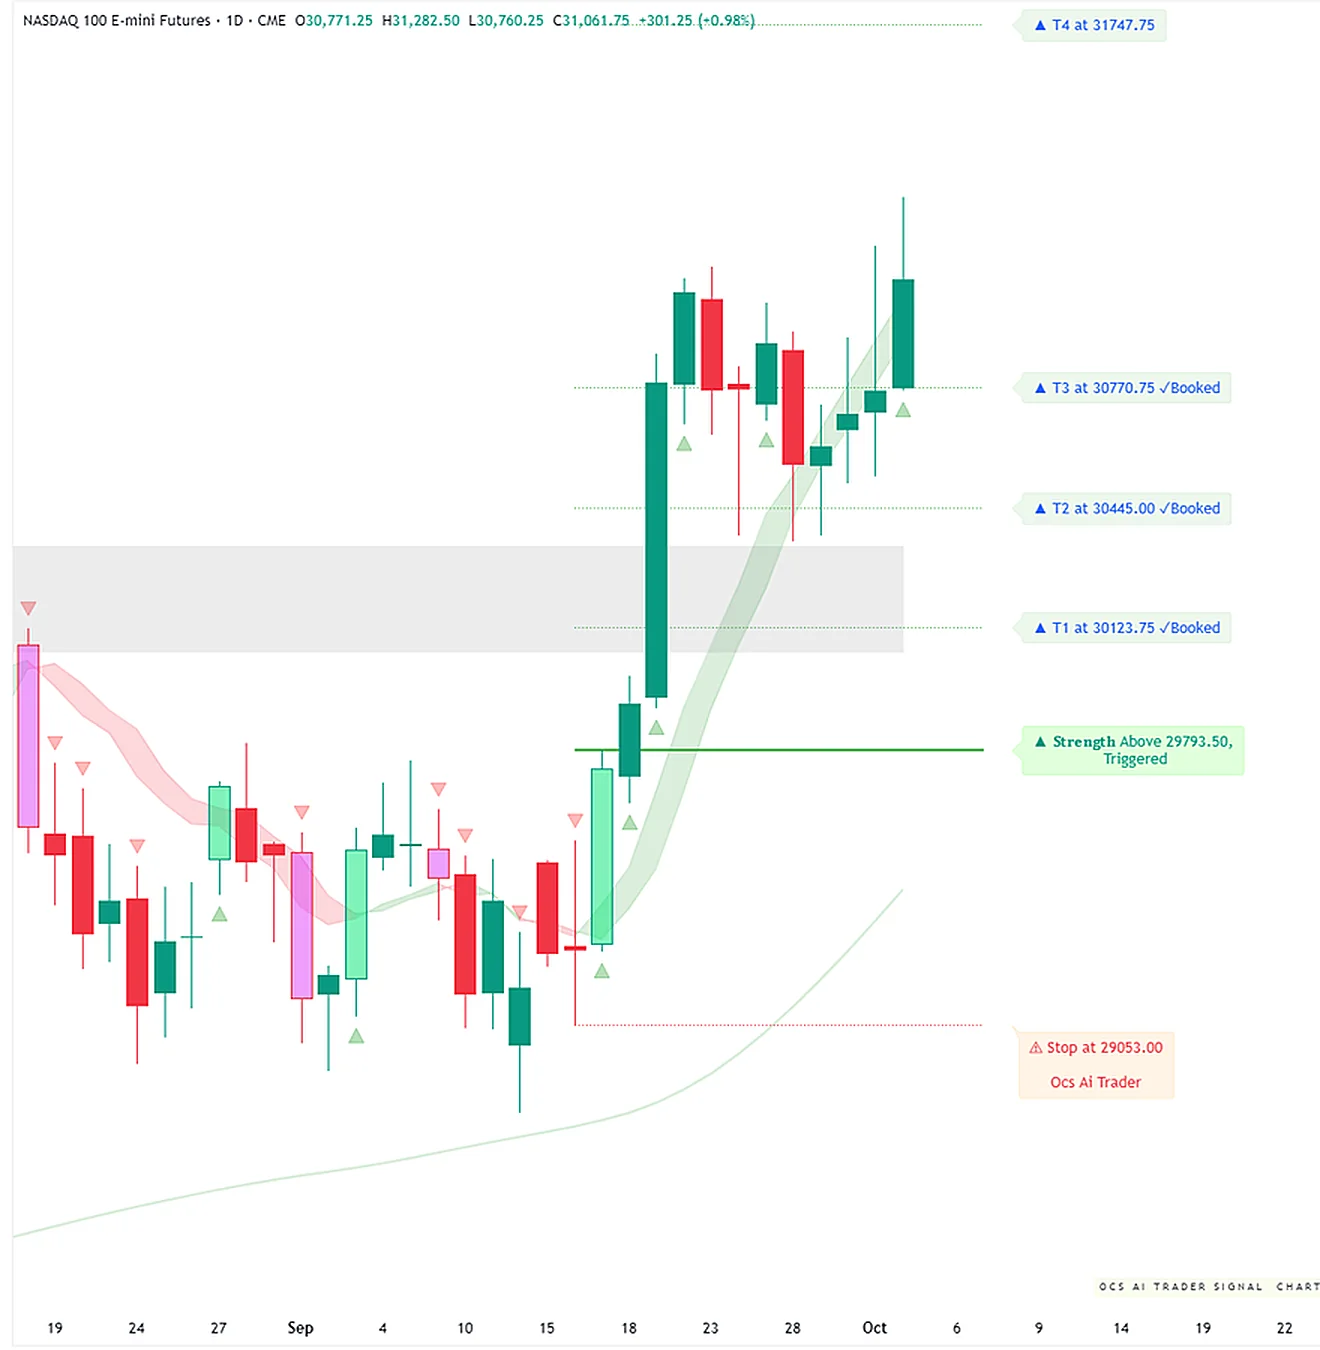
The consensus outlook for NQ=F is Bullish with medium conviction. While Chart 1 — Signals + Liquidity shows an active long position with three targets already reached, it cautions of bearish divergence within the liquidity tracker. This is balanced by Chart 2 — Delta + Technical, which demonstrates strong trend alignment through net bullish delta and EMA positioning, though it warns of overbought conditions.
Consensus Verdict
Final Bias
Conviction
Key Action
Bullish
medium
Observe for potential price consolidation or a pullback as Chart 2 — Delta + Technical signals overbought RSI and Chart 1 — Signals + Liquidity shows bearish liquidity divergence.
Reason: The structural trend remains upward across both models, but momentum-based indicators suggest an imminent period of consolidation or exhaustion.
Where the charts agree
Both charts maintain a Bullish bias despite internal warnings of momentum fatigue.
Both analyses signal potential exhaustion: Chart 1 — Signals + Liquidity via bearish liquidity divergence and Chart 2 — Delta + Technical via decelerating MACD and overbought RSI.
The trade plan shows 3 targets booked in an active long setup, but the Liquidity Tracker indicates a bearish divergence and a recent fast-line cross below the slow line.
31336.75
NQ=F — Delta + Technical (click to expand)
Delta Configuration
Bias
Recent Signal
Volume Strength
Envelope Position
net bullish
▲ bullish triangle
moderate
price near upper envelope
EMA (9 / 21)
EMA 9
EMA 21
Cross State
Price vs EMAs
18,534.65
18,473.53
bullish cross (EMA9 above EMA21)
price above both EMAs
RSI (14)
Current
Zone
Divergence
77.92
overbought (>70)
none
MACD (12, 26, 9)
Histogram
Signal Cross
Momentum
contracting green
bullish (MACD above signal)
decelerating up
Confluence
Indicators Aligned
Dominant Direction
3 bullish / 1 bearish
bullish
Outlook
Bias
Conviction
Reason
Key Level
Bullish
medium
Strong bullish delta and EMA alignment suggest upward trend, but overbought RSI and decelerating MACD indicate a potential pause.
18,473.53 (EMA 21 support)
* **Price:** 30,709.00 (+22.71%)
* **Analysis:** The index is in a parabolic state with RSI(14) at 79.01 (overbought). The price has decoupled from the 20d SMA (29,519).
* **Causal Chain:** Earnings beats → Momentum → Passive Rebalancing → Selling TLT.
* **Risk:** The "Passive Liquidity Vacuum." If the rally stalls, the lack of ES-wide breadth will cause a vacuum-like drop.
The consensus for ES=F is Bullish, though the outlook is tempered by emerging signs of momentum exhaustion. While Chart 1 — Signals + Liquidity highlights a strong uptrend with four targets already booked, Chart 2 — Delta + Technical warns of decelerating MACD momentum and overbought RSI levels.
Consensus Verdict
Final Bias
Conviction
Key Action
Bullish
medium
Monitor for potential consolidation or a pullback toward the Chart 2 EMA 21 (7465.72) given the overbought readings in both analyses.
Reason: The structural bullish trend remains intact, but price is currently navigating overbought territory with decelerating momentum.
Where the charts agree
Both charts signal overbought conditions: Chart 1 — Signals + Liquidity reports a liquidity reading near +2, while Chart 2 — Delta + Technical shows an RSI of 74.33.
Primary trend direction is bullish according to Chart 1 — Signals + Liquidity (bullish uptrend) and Chart 2 — Delta + Technical (EMA 9 > EMA 21 and net bullish delta).
Where the charts disagree
Conviction levels differ: Chart 1 — Signals + Liquidity maintains high conviction based on target achievement, whereas Chart 2 — Delta + Technical suggests medium conviction due to technical exhaustion signs.
Key Levels to Watch
7566.56 — EMA 9 (Chart 2)
7465.72 — EMA 21 (Chart 2)
7376.00 — Key Level/Target (Chart 1)
ES=F — Signals + Liquidity (click to expand)
Trade Signal
Direction
Status
Trigger
T1
T2
T3
T4
T5
Stop
Booked
LONG
active, 4 targets booked
6583.50
6686.00
6766.00
6887.00
7190.75
7376.00
6353.25
T1, T2, T3, T4
Price Snapshot
Current Price
Change
Trend
7428.00
-2.00 (-0.03%)
Bullish uptrend
Risk Reward
R:R to T1
R:R to Furthest Target
0.45
3.44
Liquidity Tracker
Background Zone
Fast Line
Slow Line
Cross Signal
Extreme Reading
Price Divergence
bullish green
above zero, falling
above zero, rising
converging
near +2 overbought
none
Outlook
Bias
Conviction
Reason
Key Level to Watch
Bullish
high
The trade plan has 4 targets booked with T5 still pending, and the liquidity tracker remains in the bullish green zone.
7376.00
ES=F — Delta + Technical (click to expand)
Delta Configuration
Bias
Recent Signal
Volume Strength
Envelope Position
net bullish
▲ bullish triangle
weak
price near upper envelope
EMA (9 / 21)
EMA 9
EMA 21
Cross State
Price vs EMAs
7,566.56
7,465.72
bullish cross (EMA9 above EMA21)
price between EMAs
RSI (14)
Current
Zone
Divergence
74.33
overbought (>70)
none
MACD (12, 26, 9)
Histogram
Signal Cross
Momentum
contracting green
bullish (MACD above signal)
decelerating up
Confluence
Indicators Aligned
Dominant Direction
3 bullish / 1 bearish
bullish
Outlook
Bias
Conviction
Reason
Key Level
Bullish
medium
Bullish trend established by EMA9 > EMA21 and positive delta, though RSI is overbought and MACD momentum is decelerating.
7,465.72
* **Price:** 7,624.25 (+10.68%)
* **Analysis:** RSI(14) is at 74.58. The term structure is flattening.
* **Causal Chain:** Tech concentration is masking weakness in the broader 490 stocks.
* **Risk:** If tech leadership falters, the index has no support.
RTY=F is exhibiting a tug-of-war between structural bullishness and short-term momentum exhaustion. While Chart 1 — Signals + Liquidity confirms a strong bullish liquidity regime and the successful booking of T1 (2911.6), Chart 2 — Delta + Technical highlights immediate headwinds from net bearish delta and decelerating MACD momentum. The market is currently consolidating as it attempts to bridge the gap between T1 and T2.
Consensus Verdict
Final Bias
Conviction
Key Action
Bullish
medium
Observe for price to clear the upper envelope or Chart 1 T2 to confirm a resumption of the trend following the current delta-driven deceleration.
Reason: The prevailing bullish trend and liquidity support are being challenged by bearish delta signals and a loss of momentum in the MACD.
Where the charts agree
Price is currently in a consolidation phase, trading between Chart 1's T1 and T2 levels and positioned between the EMAs in Chart 2.
Structural momentum remains positive, supported by Chart 1's bullish liquidity regime and Chart 2's bullish RSI (62.15) and EMA 9/21 crossover.
Where the charts disagree
Chart 1 maintains a Bullish outlook driven by liquidity, whereas Chart 2 suggests a Neutral bias due to net bearish delta and decelerating MACD momentum.
Key Levels to Watch
2962.9 — T2 Target (Chart 1)
2911.6 — T1 Level/Consolidation Zone (Chart 1)
2,885.5 — EMA 21 Support (Chart 2)
2,742.4 — Stop Loss (Chart 1)
RTY=F — Signals + Liquidity (click to expand)
Chart Analysis
Field
Value
Summary
## Direction & Status Long; active between T1 and T2. ## Trade Plan Levels - Trigger: 2855.8 - T1: 2911.6 (Booked) - T2: 2962.9 - T3: 3015.0 - Stop: 2742.4 ## Risk:Reward 0.49 (to T1); 1.40 (to T3). ## Liquidity Tracker The market is currently in a strong bullish green liquidity regime. Both oscillator lines sit well above the 0-line, with the fast line showing a slight downward slope but remaining in positive territory. The liquidity tracker confirms the long trade direction, as momentum remains structurally bullish. ## Price Action Price has successfully cleared the trigger and booked T1 (2911.6). It is currently consolidating and trading between T1 and T2. ## Outlook Bullish; price action is trending higher and is supported by a sustained bullish liquidity regime.
RTY=F — Delta + Technical (click to expand)
Delta Configuration
Bias
Recent Signal
Volume Strength
Envelope Position
net bearish
▼ bearish triangle
weak
price near upper envelope
EMA (9 / 21)
EMA 9
EMA 21
Cross State
Price vs EMAs
2,936.0
2,885.5
bullish cross (EMA9 above EMA21)
price between EMAs
RSI (14)
Current
Zone
Divergence
62.15
bullish momentum (50-70)
none
MACD (12, 26, 9)
Histogram
Signal Cross
Momentum
contracting red
bullish (MACD above signal)
decelerating down
Confluence
Indicators Aligned
Dominant Direction
3 bullish / 1 bearish
mixed
Outlook
Bias
Conviction
Reason
Key Level
Neutral
medium
Bullish price action and EMA crossover are facing headwinds from bearish delta signals and decelerating MACD momentum.
2,885.5
* **Price:** 2,929.10 (+10.20%)
* **Analysis:** Caught in the debt-energy pincer.
* **Causal Chain:** Energy costs ↑ + Debt Costs ↑ = Earnings ↓.
* **Risk:** Insolvency cycle for highly leveraged small-caps if energy remains at $94+.
The outlook for CL=F is currently bifurcated, presenting a significant conflict between trend-following liquidity signals and immediate momentum indicators. Chart 1 — Signals + Liquidity signals a high-conviction Bullish long position triggered at 94.21, supported by an improving liquidity oscillator. Conversely, Chart 2 — Delta + Technical presents a high-conviction Bearish outlook, citing negative volume delta, bearish RSI momentum, and an expanding negative MACD histogram.
Consensus Verdict
Final Bias
Conviction
Key Action
Neutral
low
Monitor for a decisive breakout above the 94.21 trigger level to reconcile the Chart 1 bullish structure with the Chart 2 bearish momentum indicators.
Reason: A fundamental conflict exists between the structural bullish trend identified in Chart 1 and the immediate bearish momentum/delta confluence reported in Chart 2.
Where the charts agree
(none)
Where the charts disagree
Chart 1 — Signals + Liquidity maintains a high-conviction 'Bullish' bias based on trend structure and long trigger at 94.21, whereas Chart 2 — Delta + Technical shows a high-conviction 'Bearish' bias driven by negative delta and momentum indicators.
Chart 1 — Signals + Liquidity identifies a bullish uptrend, while Chart 2 — Delta + Technical reports price is currently below both the EMA 9 and EMA 21.
Key Levels to Watch
97.42 — Chart 1 T1 Target
94.21 — Chart 1 Long Trigger
93.45 — Chart 2 EMA 9/21 Resistance
89.55 — Chart 1 Stop Loss
CL=F — Signals + Liquidity (click to expand)
Trade Signal
Direction
Status
Trigger
T1
T2
T3
T4
T5
Stop
Booked
LONG
active, 0 targets booked
94.21
97.42
101.41
104.11
N/A
N/A
89.55
None
Price Snapshot
Current Price
Change
Trend
94.21
+0.76 (+0.84%)
Bullish uptrend
Risk Reward
R:R to T1
R:R to Furthest Target
0.69
2.12
Liquidity Tracker
Background Zone
Fast Line
Slow Line
Cross Signal
Extreme Reading
Price Divergence
neutral amber
below zero, rising
below zero, flat
converging
mid-range neutral
none
Outlook
Bias
Conviction
Reason
Key Level to Watch
Bullish
high
The long trade plan is triggered at 94.21, supported by a bullish trend in the liquidity chart and an improving oscillator.
97.42
CL=F — Delta + Technical (click to expand)
Delta Configuration
Bias
Recent Signal
Volume Strength
Envelope Position
net bearish
▼ bearish triangle
moderate
price near lower envelope
EMA (9 / 21)
EMA 9
EMA 21
Cross State
Price vs EMAs
93.45
93.45
converging
price below both EMAs
RSI (14)
Current
Zone
Divergence
40.40
bearish momentum (30-50)
none
MACD (12, 26, 9)
Histogram
Signal Cross
Momentum
expanding red
bearish (MACD below signal)
accelerating down
Confluence
Indicators Aligned
Dominant Direction
all 4 bearish
bearish
Outlook
Bias
Conviction
Reason
Key Level
Bearish
high
Strong bearish confluence from negative volume delta, RSI in bearish territory, and expanding negative MACD histogram.
93.45 (EMA21 resistance)
* **Price:** 94.47 (+32.63%)
* **Analysis:** Geopolitical risk premium is fully priced in.
* **Causal Chain:** Mideast peace process stall → Supply risk → Price spike.
* **Risk:** If the geopolitical situation de-escalates, the mean reversion will be violent.
NG=F (Natural Gas)
Price: 3.17 (+6.96%)
Analysis: Moving in sympathy with oil, though less impacted by the Mideast risk premium.
The consensus for TLT is Bullish with medium conviction. While Chart 1 — Signals + Liquidity notes a successful run through three profit targets (T1-T3) but warns of a neutral liquidity environment, Chart 2 — Delta + Technical reinforces the trend with a bullish EMA cross and MACD staying above the signal line. Traders should monitor if decelerating MACD momentum (Chart 2) impacts the push toward the next major target at 87.45 (Chart 1).
Consensus Verdict
Final Bias
Conviction
Key Action
Bullish
medium
Monitor for momentum exhaustion as Chart 2 MACD histogram contracts while attempting to reach the Chart 1 target of 87.45.
Reason: Technical indicators and trade execution are aligned bullishly, though momentum is decelerating and liquidity remains in a neutral zone.
Where the charts agree
Both analysts maintain a Bullish bias with medium conviction.
Chart 1's successful booking of T1-T3 aligns with Chart 2's bullish technical confluence (EMA, MACD, RSI).
Chart 1's 'Reversing' trend status is supported by Chart 2's bullish EMA cross and MACD signal state.
Where the charts disagree
Chart 1 identifies price momentum as 'Reversing' with a neutral liquidity tracker, whereas Chart 2 sees 'Bullish momentum' via RSI and 'Net bullish' delta.
Key Levels to Watch
87.45 — Key resistance/Target (Chart 1)
85.52 — EMA 21 support (Chart 2)
85.90 — EMA 9 level (Chart 2)
83.04 — Stop Loss (Chart 1)
TLT — Signals + Liquidity (click to expand)
Trade Signal
Direction
Status
Trigger
T1
T2
T3
T4
T5
Stop
Booked
LONG
active, 3 targets booked
84.27
84.61
85.54
85.67
87.45
88.45
83.04
T1, T2, T3
Price Snapshot
Current Price
Change
Trend
85.30
+0.18 (+0.21%)
Reversing
Risk Reward
R:R to T1
R:R to Furthest Target
0.28
3.40
Liquidity Tracker
Background Zone
Fast Line
Slow Line
Cross Signal
Extreme Reading
Price Divergence
neutral amber
above zero, rising
below zero, flat
fast crossed above slow
mid-range neutral
none
Outlook
Bias
Conviction
Reason
Key Level to Watch
Bullish
medium
The trade plan has successfully booked three targets for a long setup, though the liquidity tracker is currently in a neutral zone.
87.45
TLT — Delta + Technical (click to expand)
Delta Configuration
Bias
Recent Signal
Volume Strength
Envelope Position
net bullish
▲ bullish triangle
weak
price near lower envelope
EMA (9 / 21)
EMA 9
EMA 21
Cross State
Price vs EMAs
85.90
85.52
bullish cross (EMA9 above EMA21)
price between EMAs
RSI (14)
Current
Zone
Divergence
53.18
bullish momentum (50-70)
none
MACD (12, 26, 9)
Histogram
Signal Cross
Momentum
contracting green
bullish (MACD above signal)
decelerating up
Confluence
Indicators Aligned
Dominant Direction
all 4 bullish
bullish
Outlook
Bias
Conviction
Reason
Key Level
Bullish
medium
Bullish EMA cross and MACD remains above the signal line, despite decelerating momentum.
85.52
* **Price:** 85.65 (+0.21%)
* **Analysis:** Under immense pressure from the NQ/ES rebalancing flow.
* **Causal Chain:** Tech rally → Passive selling of TLT → Yields ↑.
Historical Parallels
We are looking at a market structure reminiscent of the late 1970s, specifically the 1979-1980 period, where energy shocks collided with a rigid, high-growth sector (then, the "Nifty Fifty"). The key difference today is the speed of passive index rebalancing, which did not exist in the 70s. This accelerates the "convexity trap," shortening the cycle from years to weeks.
Outlook & Risk Matrix
Horizon
Outlook
Key Driver
Short-Term (1-5 Days)
High Volatility / Upward Bias
Tech momentum continues to squeeze shorts.
Medium-Term (1-4 Weeks)
Correction Risk
The "Convexity-Yield Trap" hits a breaking point.
Scenarios:
Bull: Tech earnings continue to beat, and energy prices stabilize, allowing the RTY to catch up. (Probability: Low)
Bear: Yields spike due to TLT liquidation, breaking the NQ valuation model, causing a systemic sell-off. (Probability: High)
Base: NQ continues to diverge, ES/RTY languish, volatility increases as the liquidity vacuum widens. (Probability: Medium)
What to Watch
Passive Rebalancing Flows: Monitor volume in TLT and ES=F. If TLT volume spikes while price drops, the "convexity trap" is tightening.
Energy-Breadth Correlation: Watch if XLE (Energy) and XLK (Tech) continue to rise together. If they decouple, the "reflation trade" is failing.
RTY Credit Spreads: Watch HYG. If credit spreads widen while RTY rallies, the small-cap rally is a "dead cat bounce" fueled by liquidity, not fundamentals.
Fed Rhetoric: Any shift from "higher for longer" to "emergency intervention" will immediately invert the current trade setup.
Education and market research only, not financial advice. Charts are OCS AI Trader readings at the time of writing and change with new bars.